Lighting & interviews / Beginner-friendly guide
How to light an interview in a small office
Choose the room, shape the face, and control the background. A practical lighting plan for a clear, consistent interview in a compact space.
A good interview room does not have to be a studio. It does need enough control to keep the speaker’s face readable, the background intentional, and the look consistent while the conversation unfolds.
In a small office, the most useful first move is often moving the chair. Before adding more fixtures, look at the windows, ceiling lights, reflective surfaces, and the space behind the person. This guide gives you a practical order for making those decisions, whether you are filming the interview or preparing a room for a crew.
Choose the camera position and background. Establish one main light. Evaluate the shadows. Add or subtract light only to solve something you can see in the frame. A familiar three-light arrangement is a useful vocabulary, not a requirement to use three powered fixtures.
1. Choose a frame before placing the lights
Walk through the available rooms with the intended interview time in mind. Ask for a quick view from the actual camera position, rather than judging only from the doorway. A spacious-looking conference room may have a bright window behind every usable chair or a glass wall that reflects the entire setup.
- Background: choose a view that supports the person’s role without exposing private screens, paperwork, or access information.
- Depth: leave some space between the speaker and the background where the room allows. This gives you more options for framing and controlling what the main light reaches.
- Daylight: check whether direct sunlight will move across the face or background during the planned interview.
- Sound and access: listen for HVAC, traffic, and neighboring meetings. A lighting-friendly corner is not automatically a good recording location.
For a hypothetical founder interview, a quiet room with a simple shelf behind the chair may be more useful than a busy open office. That is a planning example, not a claim about a past client production.
2. Build the face with one main source
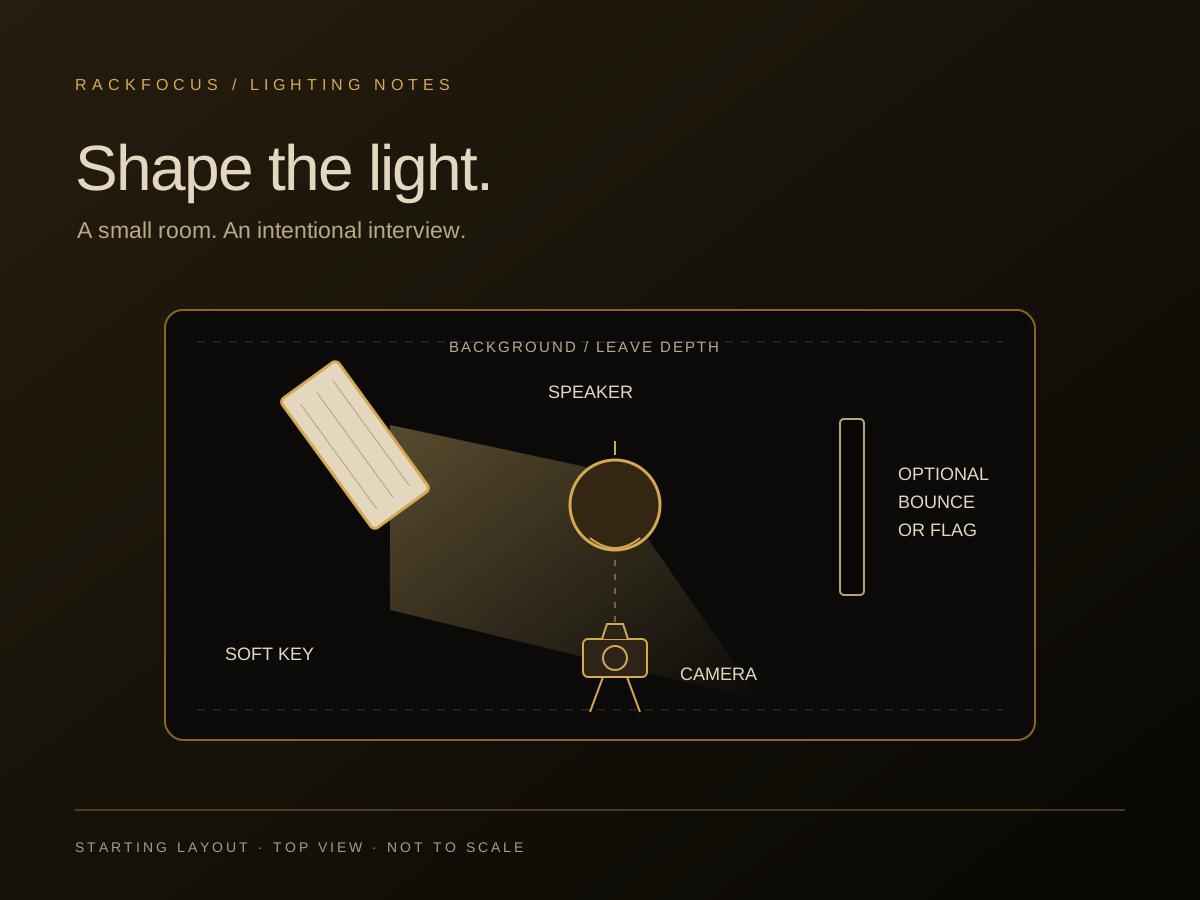
The key light is the main light on the person. ARRI’s lighting handbook describes its role in shaping a face through light and shadow. Start with the source to one side of the camera and somewhat above the speaker’s eye line, then adjust while watching the actual image.
Look for a direction that keeps the eyes readable and gives the face shape. Ask the person to turn toward the interviewer and speak naturally; a setup that works only while they hold perfectly still is not finished. If glasses reflect the source, try changing the source’s height or angle, the camera position, or the relationship between them. Check both lenses as the speaker moves.
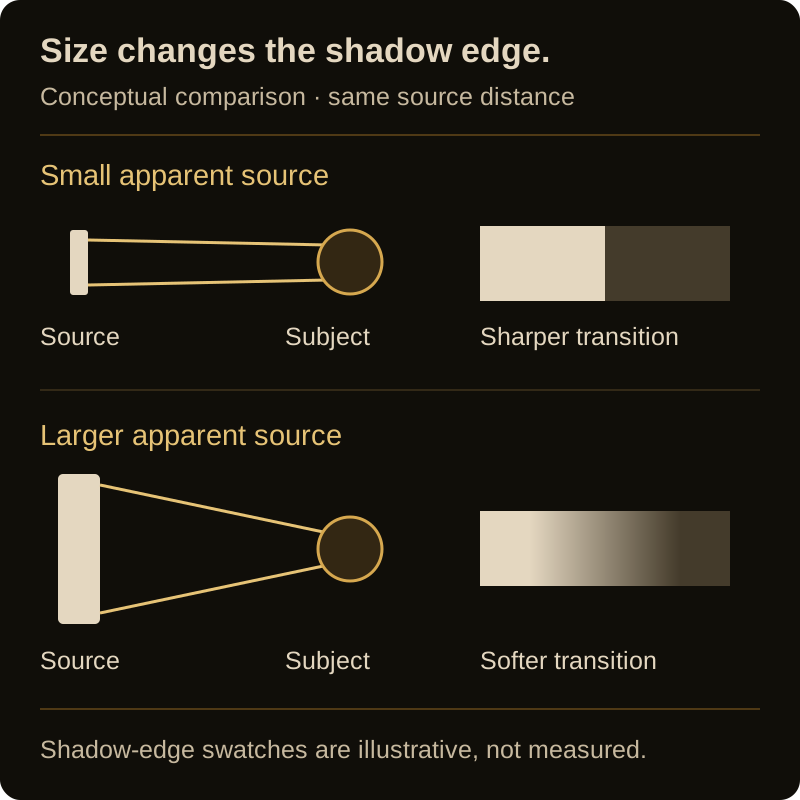
A source that appears larger from the subject’s position generally produces softer shadow edges. ARRI explains how diffusion and bounce can create a larger working source. Turning down a small, hard source changes its output, not its apparent size. Judge softness from the shadow transitions, separately from how bright the face is.
Open full-size diagram ↗
A window can serve as the key when its direction and changes are manageable. A diffused fixture gives you another way to establish the look. Choose based on the room, the available equipment, and the length of the session; this is not a shopping checklist.
3. Decide what the shadow side needs
After the key looks useful, inspect the other side of the face. Is it pleasantly shaped, too dark for the intended tone, or so bright that the lighting has lost direction?
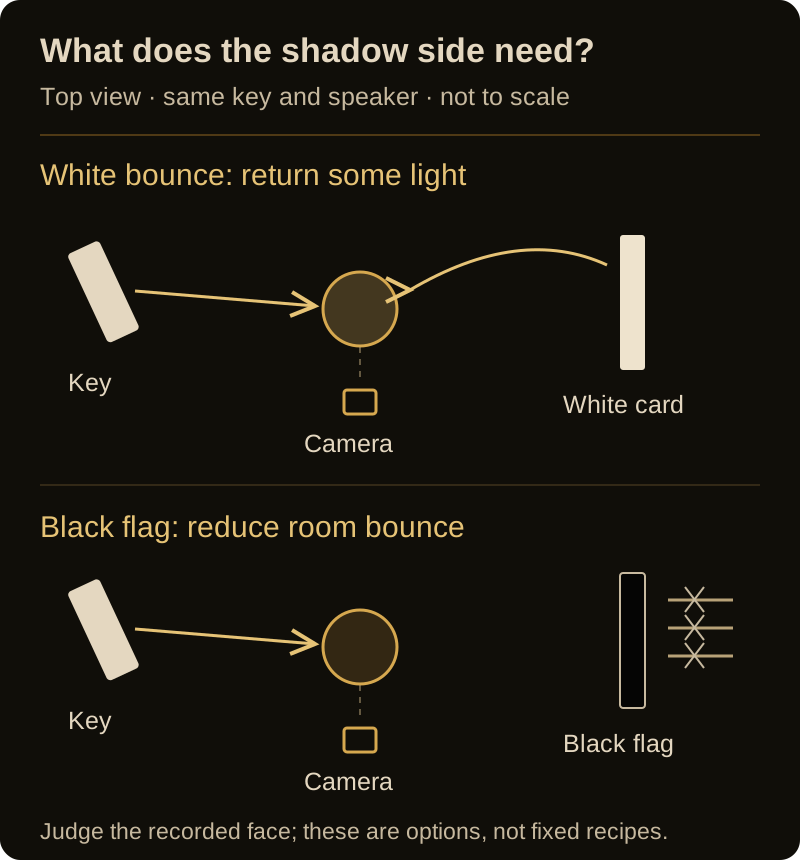
If the shadows need opening up, try a white bounce surface or a soft fill source. ARRI’s handbook describes fill as a way to control shadow density and cautions against creating a second set of hard shadows. Increase fill gradually while watching the result.
If white walls are already bouncing too much light back, try a black flag on the shadow side to absorb some of that return. This is commonly called negative fill. Move it carefully while comparing the image, and keep it out of the speaker’s movement space. The aim is controlled shape, not making every interview dramatic.
Open full-size diagram ↗
The room-layout diagram at the top is a starting layout: key on one side, camera facing the speaker, and optional bounce or negative fill on the other. It is not to scale. The room and the person determine the final positions.
4. Control the background before adding a rim light
A soft key can also spill onto walls, shelves, and glass. Before bringing in another fixture, check whether an unnecessarily bright patch is pulling attention away from the speaker. Reposition or angle the key, or use suitable light-control accessories to keep it where you want it.
A separation light can help distinguish a person from the background, but ARRI notes that it is not always necessary. Check the frame first. A different background tone, a small change in chair position, or a more deliberate composition may already provide enough separation.
If you add a hair or edge light, compare it with the rest of the scene. It should help the image, rather than become a bright stripe that distracts from the interview. Recheck it when the speaker leans forward or turns.
5. Make the look repeatable
A room may contain daylight, ceiling fixtures, desk lamps, and your production lights. Decide which sources belong in the look. If permitted, turn off unhelpful overheads and compare. Do not assume changing one camera white-balance setting can make visibly different light colors on the face disappear.
Set and review exposure and white balance for the lighting you chose. Record a test at the actual frame rate and shutter settings, then watch it back for flicker, changing daylight, distracting reflections, and unexpected color shifts. Fixtures and dimmers differ, so there is no single setting that guarantees a clean result in every office.
For several interviews in the same room, photograph the setup and note the camera settings, source positions, dimmer settings, and window treatment. Mark the chair position when permitted. Before each person starts, check the image again: different height, clothing, glasses, and movement can require an adjustment.
6. Give the organizer a useful room brief
If you are booking the room, send the crew a few current phone photos, the interview time, and any restrictions. Confirm whether lights can be switched off, blinds adjusted, furniture moved, and the room held between interviews. Include building access and the person who can resolve a location question.
Protect setup time before the first speaker arrives. Keep stands stable and appropriately secured, cables clear of walkways, and exits accessible. Use diffusion and accessories rated for the fixture and follow its instructions, especially around heat and ventilation. In a tight room, removing an unnecessary stand can be a better decision than squeezing in another light.
A final check before the first question
- Record the seated speaker looking toward the interviewer, then leaning and turning naturally.
- Check eyes, glasses, facial shadows, clothing, and background distractions at the intended framing.
- Watch back the test for flicker and changes in daylight, not just a frozen camera image.
- Listen to the audio test and confirm that lighting equipment has not introduced an unwanted fan or hum into the recording.
- Keep a setup photo and recheck after every meaningful change.
You are ready when the setup supports a comfortable conversation and holds together in the recorded image. The goal is a clear, intentional interview, not the largest lighting package you can fit in the room.
Sources & editorial notes
Original planning guidance by RackFocus Cinema. Technical reference checked October 16, 2026: ARRI Lighting Handbook, particularly “Light Quality” and “Hard vs. Soft Light” (printed pages 5–8), and key, fill, separation, and background definitions (pages 12–15). The handbook explains the source-size, shadow, fill, and spill-control principles used here; the room workflow and checklist are editorial recommendations. The diagrams are original RackFocus Cinema vector illustrations, not client photographs or measured lighting tests. Layouts are conceptual and not to scale. No client project, outcome, or equipment endorsement is implied.